

Almost no config!!! Snowpack ❄️ + React + TS

Recently, I have seen Snowpack so many times, so I think it's time to try it.
Actually, we can use create-snowpack-app to create a base app, but I think trying to create a simple app without using that can be helpful to understand the basics of Snowpack.
In this article, I tried Snowpack with reactjs and typescript.
What I made is here. {% github koji/snowpacktest %}
What is Snowpack?
Snowpack is a modern, lightweight build tool for faster web development. Traditional JavaScript build tools like webpack and Parcel need to rebuild & rebundle entire chunks of your application every time you save a single file. This rebundling step introduces lag between hitting save on your changes and seeing them reflected in the browser.
How Snowpack Works snowpack.dev/concepts/how-snowpack-works
Create a project dir and init project
$ mkdir snowpacktest
$ yarn init
Install Snowpack and add npm script
$ yarn add --dev snowpack
"scripts": {
    "dev": "snowpack dev",
    "build": "snowpack build"
  },
Create snowpack.config.js
In this case, public is set as the root dir.
module.exports = {
  mount: {
    public: { url: "/", static: true },
    src: "/",
  },
};
Doc: snowpack.config.js snowpack.dev/reference/configuration#config..
Create index.html
<!DOCTYPE html>
<html lang="en">
    <head>
        <meta charset="utf-8" />
        <meta name="viewport" content="width=device-width, initial-scale=1" />
        <title>my first snowpack app</title>
    </head>
    <body>
        <div id="root"></div>
        <script type="module" src="/index.js"></script>
    </body>
</html>
Install react and typescript
$ yarn add react react-dom
$ yarn add -D typescript @types/react @types/react-dom
Just in case, I put my tsconfig.json
{
    "compilerOptions": {
        "module": "ESNext",
        "target": "ESNext",
        "strict": true,
        "moduleResolution": "node",
        "esModuleInterop": true,
        "jsx": "preserve",
        "noEmit": true,
        "skipLibCheck": true,
        "typeRoots": [
            "node_modules/@types",
            "types"
        ]
    },
    "include": [
        "src",
        "types"
    ]
}
Create a simple component
src/index.tsx
import React from 'react';
import { render } from 'react-dom';

const App = () => {
    return (
        <>
          <h1>my first snowpack+react app</h1>
          <ImageWrapper>
              <img src={logo} />
          </ImageWrapper>
          <h2>hello ❄️Snowpack❄️</h2>
        </>
    );
};
render(<App />, document.getElementById('root'));
Use devServer
$ yarn dev

snowpack

  http://localhost:8080 • http://192.168.86.27:8080
  Server started in 14ms.
If you know webpack, you may think that's it? since generally, we need to put more lines in config.js file for webpack. But, actually, that is it 😁
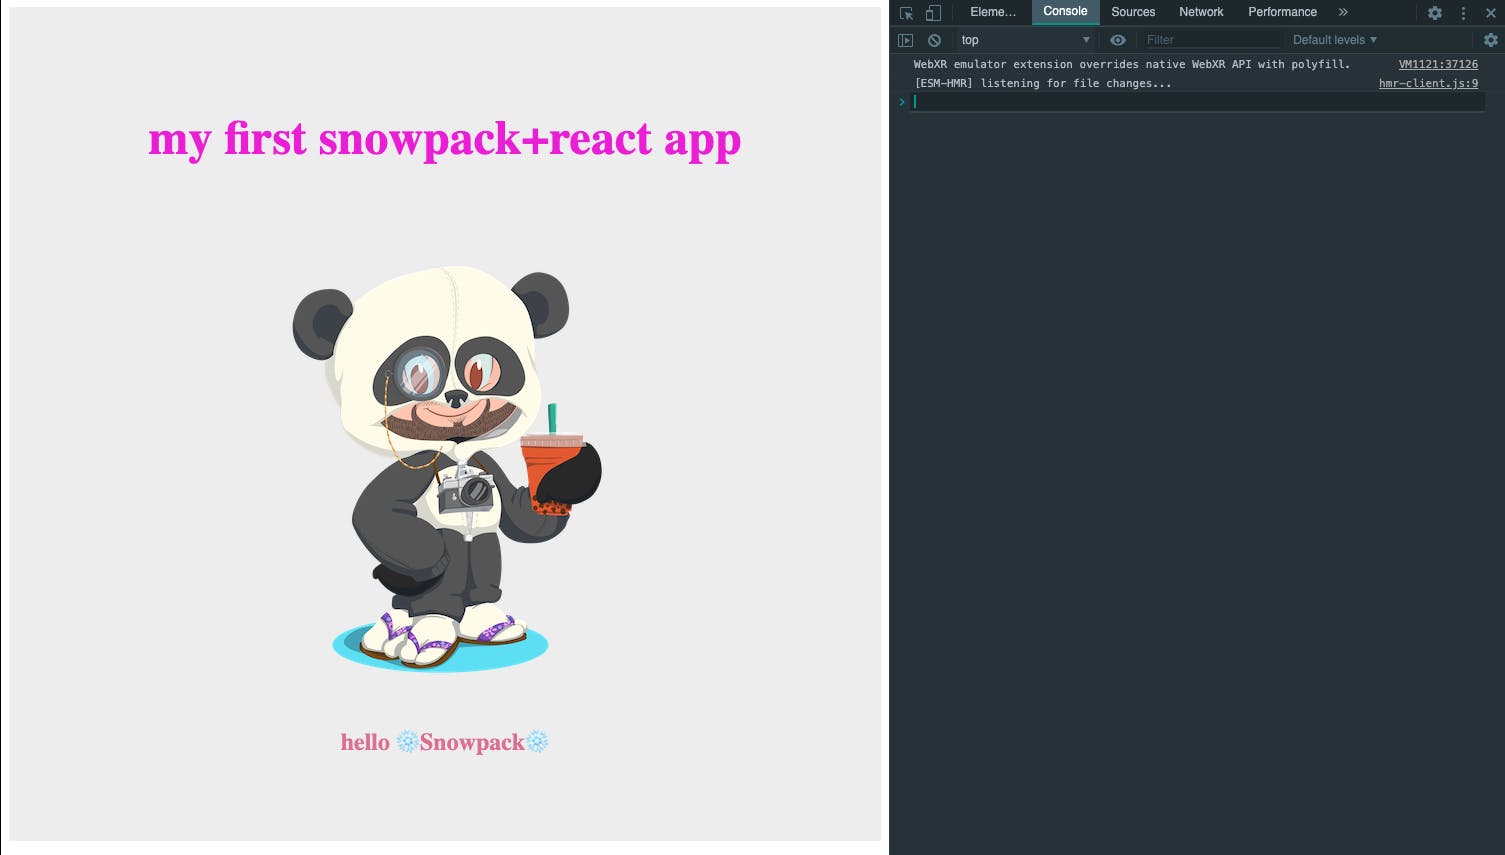
Let's try to display an image!
Create types/image.d.ts
To display image, we need to create a .d.ts file. In this case, we put .png, .jpg, and .svg.
declare module '*.png';
declare module '*.jpg';
declare module '*.svg';
Add lines to index.tsx
To display an image, we need to modify index.tsx a little bit.
First, install styled-components since I like it lol
$ yarn add styled-components
$ yarn add -D @types/styled-components
If you are not familiar with styled-components, please see the link. styled-components.com
import React from 'react';
import { render } from 'react-dom';
import logo from './source.png';
import styled from 'styled-components';

const Wrapper = styled.section`
  padding: 4em;
  background: #ededed;
`;

const Title = styled.h1`
  font-size: 3em;
  text-align: center;
  color: #ea1ed4;
`;

const ImageWrapper = styled.div`
  display: flex;
  align-items: center;
  justify-content: center;
`;

const Greeting = styled.h2`
  font-size: 1.5em;
  text-align: center;
  color: palevioletred;
`;


const App = () => {
    return (
        <Wrapper>
          <Title>my first snowpack+react app</Title>
          <ImageWrapper>
              <img src={logo} />
          </ImageWrapper>
          <Greeting>hello ❄️Snowpack❄️</Greeting>
        </Wrapper>
    );
};
render(<App />, document.getElementById('root'));
If you prefer to use css, you will need to create a .d.ts for importing css
types/css.d.ts
declare module '*.css' {
  const classNames: { [className: string]: string };
  export default classNames;
}
Conclusion
Snowpack is pretty cool since not it supports jsx and typescript source code by default. Also we don't need to install any plugin to use dev server which is great. Of course, we can extend the build with custom plugins. snowpack.dev/plugins I think I will start using Snowpack for my side-project!